 Serial Firmware Update
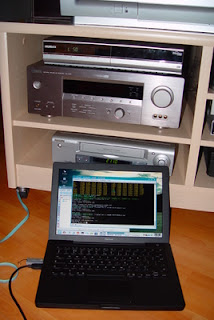
Unfortunately the Humax 9200T PVR does not support the Apple platform for its manual firmware update. I have just managed to update the Hummy using my MacIntel MacBook. This is how I did it... WhatI did was boot my MacBook using a Knoppix (v5) LiveCD and using my Prolific USB to Serial converted flashed the latest firmware using the Linux version of FlashWriter 4!
What you need:1. Knoppix 5 Live CD from
Knoppix or you can get it
here.
2. FlashWriter 4 for Linux from
Humax Community or
here.
3. A Prolific USB to Serial cable (pl2303) (or supported USB to Serial cables*) from
Scan.
4. A female to female null modem cable such as this one from
eBay.
5. A USB memory stick such as this one from
Scan.
What to do:1. Boot up your MacIntel and insert the USB stick and initialise it as a FAT32 device (open a terminal and issue this command 'newfs_msdos -v FAT_VOLUME_NAME -F 32 /dev/USBSTICK' where USBSTICK is the device name e.g. disk1.
2. Download the Knoppix 5 LiveCD and burn the ISO to a CDR.
3. Download the firmware from the Humax HCSA site or
here, unpack it and save it to the USB stick.
4. Download the FlashWriter 4, unpack it (or get it
here) and save the Linux binary to the USB stick.
5. Insert the Knoppix 5 LiveCD you've just burnt and restart your MacIntel holding down the C key to boot from it.
6. When Knoppix has booted and detected your USB Stick, open a shell (terminal) console and change directory to that USB stick, e.g. cd /media/sdb1 (you might have to double-click on the USB stick's icon for it to get mounted).
7. Power-off your Hummy (switch at the back). Insert the null modem cable to Hummy serial port. Connect other end of null modem cable to USB to Serial cable, plug cable into MacIntel USB port.
8. Knoppix will recognise the USB to Serial cable but you will need to type 'modprobe pl2303' (or similar*) in the terminal console for it to assign it a TTY device name.
9. For my Prolific USB to Serial cable, typing 'dmesg' in the terminal console after inserting the device will bring up the log which says 'usb 2-1: pl2303 converter now attached to
ttyUSB0'. In other word the device has been assigned
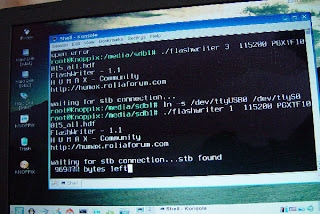
'/dev/ttyUSB0' (your device might have a different assignment - take note). Because flashwriter has been programmed to only look at devices /dev/ttyS0 to /dev/ttyS3 only, we have to link (point) our device to one of these. So in the terminal console, change to root - type 'su', and then link the devices - 'ln -s /dev/ttyUSB0 /dev/ttyS0'. This effectively assigns our device as COM port 1. If we issued 'ln -s /dev/ttyUSB0 /dev/ttyS1' then it assigns it to COM port 2.
10. Issue this flash command in the terminal console: './flashwriter 1 115200 PGXTF10015_all.hdf' where the '1' is the COM port and 'PGXTF10015_all.hdf' is the firmware update file (i.e. replace '1' and 'PGXTF10015_all.hdf' where appropriate with the COM port and firmware update file. The program will sit there waiting for you to turn the Hummy on.
11. Turn on the Hummy at the back and you will see the numbers flash in the terminal console and on the Hummy, the display will change, L10, L20, etc and then D10, D20, followed by P10, P20, etc. (the flash sequence) and then END.
12. You can power-cycle the Hummy when you see the END on the front display. Your box has been updated! :)
* Knoppix 5 currently support these USB serial devices:
aircable, airprime, ark3116, belkin_sa, cp2101, cyberjack, cypress_m8, digi_acceleport, empeg, ftdi_sio, funsoft, garmin_gps, hp4x, io_edgeport, io_ti, ipaq, ipw, ir-usb, keyspan, keyspan_pda, kl5kusb105, kobil_sct, mct_u232, mos7720, mos7840, navman, omninet, option, pl2303, safe_serial, sierra, ti_usb_3410_5052, usbserial, visor, whiteheat. These are the Knoppix USB/serial kernel modules - you might need to find out the specific brand of cables they are built for.
 Any questions? Please post a comment.


