Tuesday, 20 November 2007

Xserve Leopard Server Upgrade


I've been working on the Apple Xserve for a while now but haven't posted anything here (not that anyone is reading this ;)) because I have been waiting for a copy of the Leopard update to install on it.

With Tiger server, I managed to have a little play and experiment. I managed to create a mirror systems disk and successfully tested it out. Using these instructions on the Apple discussion forum. The one marked 'solved' is the one I followed even though it was for older version of OX Server.

I have now upgraded to Leopard server and attempted to do the same thing...

I chose the 'erase and install' option with the Leopard upgrade as I didn't have any data to keep. After the install, the new Leopard seems to have kept the RAID-1 I had setup on Tiger. I wonder if it wasn't already setup, would I had to have gone through the mirroring procedure like I did the first time (below)...

Mirroring of the 'system' disk on the Xserve is a pain since the Raid Utility does not allow you to perform operations, such as mirroring, on a 'mounted' filesystem (which the systems disk is). Therefore, you have you boot off another drive or the install disk or... before you attempt to mirror...

I have 3 disks in my Xserve, two the same size (68Gb) for mirroring and one larger, the third for situations like this - where I need to boot off it to be able to mirror my system disk!

So after the OS install or upgrade. I copied the all the systems (from Server HD) files to the third disk (Rescue):
lebigmac:/ admin$ sudo asr restore --source "/Volumes/Server HD" --target /Volumes/Rescue/
Validating target...done
Validating source...done
Validating sizes...done
Copying ....10....20....30....40....50....60....70....80....90asr: did not copy blessed information to target, which may have missing or out-of-date blessed folder information.
....100
Once copied over all the files, bless the device that is 'Rescue':
lebigmac:~ admin$ sudo bless --device /dev/disk1s2 -setBoot
Then restart the server. When it boots up check that '/' is mounted from /dev/disk1s2 and you can the start RAID utils and start mirroring (create a RAID-1 volume set) the two system disks. When done, set the original system disk device to boot:
lebigmac:~ admin$ sudo bless --device /dev/disk0s2 -setBoot
Below are some pictures of RAID utils on Tiger server:


Thursday, 15 November 2007

My First Applescript

In Applications -> AppleScript folder there's the Script Editor. Open that up to write your AppleScript. My code was

tell application "Finder"
mount volume "smb://user:pass@server/share"
end tell

The above to to automount a samba share given username user and password password on a server server with share share!

Then use the file menu and save the script as an application. Then to execute just double click and hey presto, the share is mounted in /Volume/share!

Wednesday, 14 November 2007

Parallels and Windows XP Boot Camp install

So with the Windows installation with Boot Camp, you can now run Parallels within Mac OS X with the same installation of Windows that you installed via Boot Camp.

Of course you have to be running the latest version 3 of Parallels which you can download from their website. You have to have both your version 3 and 2 license codes if you upgraded.

If you get this error:
[C] My Boot Camp

Timed out waiting for the file system to initialize.
The volume has been ejected. You can use the init_timeout mount option to wait
longer.

Then you can read more in this thread http://forum.parallels.com/showthread.php?p=87017#post87017 and the Parallels FAQ says:
6. Getting Timeout error message when mounting VM Windows disks

Install the latest MacFUSE release, available at
http://code.google.com/p/macfuse/downloads/list.

Then go to Finder -> Preferences and tick out "Connected servers".

This seems to fix that problem for me. I also had problems about a certain HAL.DLL being corrupted at one stage but a boot into Windows fully and back to Parallels boot seems to have fixed that. This was a better solution than Parallels' own suggestion of replacing the file! (given here: http://kb.parallels.com/entry/63/526/).

More info about Parallels, Windows and Boot Camp install here: http://www.notebookreview.com/default.asp?newsID=2990&article=Apple+Bootcamp+versus+Parallels

Tuesday, 6 November 2007

Boot Camp and Windows XP install

I've managed to install Windows on my Leopard iMac!

First start up Boot Camp (in Application/Utilities) and choose Create a Windows partition. Drag the boundary between Mac and Windows parition to the desired size of hard for both. Create the Windows partition.

You need to have a licensed copy of Windows CD. I had a slipstreamed Windows XP CD with SP2 on it which was burned by Nero, and subsequently caused the error "BOOT CD: cannot boot from cd - code 4" when the Mac booted and tried to install. This was solved reading this thread, and it was all to do with Nero not remembering the ADVANCED burning properties. I had to re-burn the bootable Win XP CDROM again and this time it booted and installed OK.

Go through the Windows install procedure and finish. When the Mac reboots, you need to HOLD DOWN THE ALT KEY to get the boot options - either into Leopard or Windows (or boot from the CDROM). Once on this screen hold CTRL to get the option of automatically boot into that option on a 'restart' of either Leopard or Windows.

Once Windows is installed, you will certainly have problems with the networking hardware. Windows can not detect the network card in the iMac and hence will not install it leaving you without an internet connection to do those Windows Updates!

I'm not too sure who makes the ethernet card inside the iMac but after a few searches 'YUKON' seems to crop up. I went to their website did a search for drivers using:

Product Category = PC Connectivity
Product Family = Yukon

And came up with this: http://www.marvell.com/drivers/driverSearchResults.do

I downloaded the "W2000/ XP/2003/Vista x86 & x64 Multi-Language Installer (32-bit and 64-bit) for Yukon Devices" entry - the "Miniport Windows Installer" saved it onto a USB key and unzipped it on the Windows install (thank goodness it recognised the USB!)

Once decompressed I installed it, by clicking on setup.exe, and rebooted Windows. I then had a network interface and could set that up to get internet access!

I proceeded with the Windows updates and after a 3rd successive reboot, I was able to search for the graphics card drivers. In the iMac there lives an ATI Radeon 2600 graphics card. Goto this Apple forum thread and follow the 3rd post to download and install the driver package and then install the graphics card driver.

Wednesday, 31 October 2007

Coverflow for every folder!!

With Leopard viewing any folder takes on the last view option - unlike Tiger where each folder keeps it own view setting. So if you chose the coverflow view for one folder, every folder has that view!

You can make specific folder keep its own view setting:

"If you Show View Options (Command-J) for a folder, you'll see a tick box at the top of the inspector that says something along the lines of "Always open in ..." and the current type of view. Ticking that box will set the default for the folder you're currently looking at."

So set your picture and movie folders as coverflow and tick the box. And use icon view for the default for the rest of your folders.

Tuesday, 30 October 2007

Upgraded to Leopard

Yay! I've just managed to upgrade to Leopard (10.5)!

I went for the upgrade option and everything went well...

Boo! Synergy is now broken!

Fortunately I've found this webpage: http://sourceforge.net/forum/forum.php?thread_id=1848423&forum_id=199580 detailing how to setup Synergy for Leopard.

I removed by previous configuration and setup the following (for the Synergy server, the above link sets up the client). Created the ~/Library/LaunchAgent directory and created this synergys.plist file in it:

<?xml version="1.0" encoding="UTF-8"?>
<!DOCTYPE plist PUBLIC "-//Apple Computer//DTD PLIST 1.0//EN" "http://www.apple.com/DTDs/PropertyList-1.0.dtd">
<plist version="1.0">
<dict>
<key>Label</key>
<string>com.synergys</string>
<key>ProgramArguments</key>
<array>
<string>/Users/username/bin/synergys</string>
<string>-f</string>
<string>--config</string>
<string>/Users/username/bin/synergy/synergy.conf</string>
</array>
<key>RunAtLoad</key>
<true/>
</dict>
</plist>

Then issue the commands:
sudo /usr/bin/killall synergys
launchctl load ~/Library/LaunchAgents/synergys.plist
launchctl start com.synergys

Friday, 26 October 2007

Stop temporary files saving on desktop

I've gotten annoyed with temporary files such as PDFs and JNLP files downloading to the desktop before being opened. So much so that I decided how to find out how to get rid of them...

It seems you have to make the setting using Safari (having just read someone having trouble making PDF open up within the browser itself and not running an external program...)

If you make the 'download folder' setting via Safari (and not via your fav browser) it works, and all temporary files goes there. I have now set it to /tmp (you have to type it into the search box) so that the files are cleared on a reboot.

The nice thing is that Navigator still downloads files to my specified folder on my desktop (set within Navigator)...

Funny, how we have to do it this way. I guess browsers are inheriting properties from the OS X 'system' browser...

Monday, 22 October 2007

Using MacBook closed!

I recently read from the Apple documentation how to use my MacBook with its cover closed...

All you need is, an external monitor, mouse and keyboard! Connect it all up and turn on the laptop, close the lid (it goes to sleep with the lid closed), then wake it up using your mouse or keyboard!

Silly really, but it works...

Thursday, 18 October 2007

Synergy

Do you have multiple computers on your desk and need to control them all with a single keyboard and mouse - and don't have or don't want to use a KVM?

Then, Synergy is for you! See: http://synergy2.sourceforge.net/
Download and install on your various machines, making one the server and the rest clients and hey presto...

I have my iMac as the server and 2 PCs on either side as clients. I followed the 'Create a system level start up item' and put this:

/User/son_t/bin/synergys -f --config /Users/son_t/bin/synergy/synergy.conf as the run command for the server mode (example only shows the client setup).

Wednesday, 10 October 2007

Computer name

The Mac will give your computer a silly name. To change it, do this:
  • To see your current computer name, Local Hostname, or network address, open the Sharing pane of System Preferences.
  • To change your computer's name, type a new name in the Computer Name field.
  • To change your computer's Local Hostname, click Edit and type a new name.
  • To see the address of the services you are providing, select the service. The address is displayed below the Services window.

Monday, 10 September 2007

Mozilla under X11

Dillo is rubbish really. So I've been trying to get Mozilla to work under Fink - but unfortunately it is not available for MacIntel!!

Wednesday, 5 September 2007

Fink

Do you need to run free software like on Linux or Unix? Instead of compiling them all by yourself, use Fink to do this automatically and better: http://finkproject.org/

Once installed - it works like Debian Linux, using 'apt-get install' to automatically download and install your programs/application/software.

Check it out!

I came across Fink when trying to compile and install 'dillo'. Obviously I had a very hard time doing so under native OS X with Xcode installed. It depended on so many other software utilities, packages and libraries that I kept going around in circles!

Tuesday, 28 August 2007

Parallels Desktop v3

Well after a lot of effort trying to get a USB memory key to work under the Windows XP virtual machine... I did google for the error "USB device you are trying to connect to the virtual machine" and found out I needed to upgrade from version 2.5 to 3 since I'm running OSX 10.4.10 (according to the Parallels page).

It certainly fixed the problem :)

List of programs (or alternatives) not available for OS X:
  • DreamboxManagerSuite
  • Nokia PC Suite

Friday, 24 August 2007

Windows XP on Parallels


I've finally gotten around to installing Windows XP on my MacBook under Parallels!

But you are probably asking why...? I am not an MS fan, but there are some programs out there I want to run which isn't available for the Mac (and there's not alternatives). I'm not talking about programs such as Picasa2 (why isn't that available for the Mac!?) but utilities programs and specifically those that allow me to mess about with satellites and PVRs ;)

Friday, 10 August 2007

Pascal Programming

So you want to learn to program? One of the best programming languages to start off learning from scratch is Pascal... you can get Free Pascal from freepascal.org for the Mac OS X (Intel and PowerPC versions) which can be integrated with Xcode.

My preferred (compiled) programming language of choice is C on a Unix platform but hey...

Thursday, 9 August 2007

gcc on PowerPC

So I'm hoping to compile some programs on my MacMini, which is a PowerPC not Intel... I can't find gcc or make anywhere... they are near identical:

MacMini Mac OS X 10.4.10
Darwin Kernel Version 8.10.0: Wed May 23 16:50:59 PDT 2007; root:xnu-792.21.3~1/RELEASE_PPC Power Macintosh powerpc

MacBook Mac OS X 10.4.10
Darwin Kernel Version 8.10.1: Wed May 23 16:33:00 PDT 2007; root:xnu-792.22.5~1/RELEASE_I386 i386 i386

Anyway, I found out that you can download the developer tool kit from 'ADC' - Apple Developer Connection website, but I need to register... so done that and downloaded the latest Xcode Tools and I am installing it now...

Done, and hey presto... gcc and make is there!

Wednesday, 8 August 2007

Knoppix and Humax 9200T


Serial Firmware Update

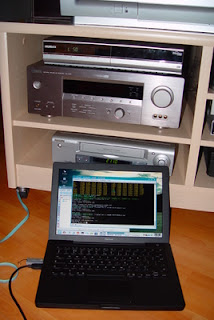
Unfortunately the Humax 9200T PVR does not support the Apple platform for its manual firmware update. I have just managed to update the Hummy using my MacIntel MacBook. This is how I did it... WhatI did was boot my MacBook using a Knoppix (v5) LiveCD and using my Prolific USB to Serial converted flashed the latest firmware using the Linux version of FlashWriter 4!

What you need:
1. Knoppix 5 Live CD from Knoppix or you can get it here.
2. FlashWriter 4 for Linux from Humax Community or here.
3. A Prolific USB to Serial cable (pl2303) (or supported USB to Serial cables*) from Scan.
4. A female to female null modem cable such as this one from eBay.
5. A USB memory stick such as this one from Scan.

What to do:
1. Boot up your MacIntel and insert the USB stick and initialise it as a FAT32 device (open a terminal and issue this command 'newfs_msdos -v FAT_VOLUME_NAME -F 32 /dev/USBSTICK' where USBSTICK is the device name e.g. disk1.
2. Download the Knoppix 5 LiveCD and burn the ISO to a CDR.
3. Download the firmware from the Humax HCSA site or here, unpack it and save it to the USB stick.
4. Download the FlashWriter 4, unpack it (or get it here) and save the Linux binary to the USB stick.
5. Insert the Knoppix 5 LiveCD you've just burnt and restart your MacIntel holding down the C key to boot from it.
6. When Knoppix has booted and detected your USB Stick, open a shell (terminal) console and change directory to that USB stick, e.g. cd /media/sdb1 (you might have to double-click on the USB stick's icon for it to get mounted).
7. Power-off your Hummy (switch at the back). Insert the null modem cable to Hummy serial port. Connect other end of null modem cable to USB to Serial cable, plug cable into MacIntel USB port.
8. Knoppix will recognise the USB to Serial cable but you will need to type 'modprobe pl2303' (or similar*) in the terminal console for it to assign it a TTY device name.
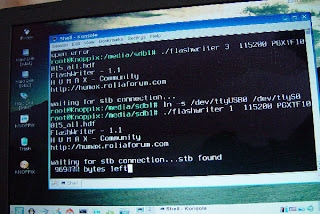
9. For my Prolific USB to Serial cable, typing 'dmesg' in the terminal console after inserting the device will bring up the log which says 'usb 2-1: pl2303 converter now attached to ttyUSB0'. In other word the device has been assigned '/dev/ttyUSB0' (your device might have a different assignment - take note). Because flashwriter has been programmed to only look at devices /dev/ttyS0 to /dev/ttyS3 only, we have to link (point) our device to one of these. So in the terminal console, change to root - type 'su', and then link the devices - 'ln -s /dev/ttyUSB0 /dev/ttyS0'. This effectively assigns our device as COM port 1. If we issued 'ln -s /dev/ttyUSB0 /dev/ttyS1' then it assigns it to COM port 2.
10. Issue this flash command in the terminal console: './flashwriter 1 115200 PGXTF10015_all.hdf' where the '1' is the COM port and 'PGXTF10015_all.hdf' is the firmware update file (i.e. replace '1' and 'PGXTF10015_all.hdf' where appropriate with the COM port and firmware update file. The program will sit there waiting for you to turn the Hummy on.
11. Turn on the Hummy at the back and you will see the numbers flash in the terminal console and on the Hummy, the display will change, L10, L20, etc and then D10, D20, followed by P10, P20, etc. (the flash sequence) and then END.
12. You can power-cycle the Hummy when you see the END on the front display. Your box has been updated! :)

* Knoppix 5 currently support these USB serial devices:
aircable, airprime, ark3116, belkin_sa, cp2101, cyberjack, cypress_m8, digi_acceleport, empeg, ftdi_sio, funsoft, garmin_gps, hp4x, io_edgeport, io_ti, ipaq, ipw, ir-usb, keyspan, keyspan_pda, kl5kusb105, kobil_sct, mct_u232, mos7720, mos7840, navman, omninet, option, pl2303, safe_serial, sierra, ti_usb_3410_5052, usbserial, visor, whiteheat. These are the Knoppix USB/serial kernel modules - you might need to find out the specific brand of cables they are built for.

Any questions? Please post a comment.

Tuesday, 7 August 2007

Speed of connected USB

From the Finder GO menu, select Utilities. In this folder, start System Profiler.

Under the USB entry there is speed info for the specify attached device.

Wednesday, 25 July 2007

Folding@home

I downloaded the Mac OS X (PPC) screen saver from the Folding@home and installed it on my Intel MacBook... it didn't work and I had a hard time uninstalling it...

I will try the Intel SMP version for OS X later but I really wanted the screensaver...

Tuesday, 24 July 2007

Compiling C on Mac OS X

The preprocessor defines for the Apple Mac plaform can be found here: http://predef.sourceforge.net/preos.html#sec17

Use it like this:
#ifdef __APPLE__ & __MACH__
#define lseek64 lseek
#define open64 open
#endif

Monday, 23 July 2007

Accessing USB drive

I'm going to start some C coding that involves accessing raw USB HDDs.

I've connected a USB drive and fired up Terminal and issued the dd and od commands:

MacBook:~ Son_t$ dd if=/dev/disk1 bs=1 skip=0 count=1024 |od -t x4
0000000 00000000 00000000 00000000 00000000
*
0000660 00000000 00000000 00000000 000000af
0000700 000008a8 f8a00000 00000000 001000af
0000720 00000008 00000000 000008a8 f8b000af
0000740 000000a0 00000000 000008b0 f8b00000
0000760 00000000 00000000 00000000 000055aa
0001000 00000000 00000000 00000000 00000000
*
1024+0 records in
1024+0 records out
1024 bytes transferred in 0.010797 secs (94841 bytes/sec)
0002000
MacBook:~ Son_t$

So far so good! :)

Monday, 2 July 2007

Zterm & serial terminal

I downloaded and installed ZTerm - a free-ish serial terminal program to use with my Prolific USB-to-serial cable. ZTerm can be downloaded here and Prolific USB-to-serial cable drivers can be downloaded here.

I also found this document on using the Mac's own Terminal application to connect to a serial device whiich works quite well. My device (once above drivers installed) turns up as '/dev/tty.usbserial'. I connect using:

screen /dev/tty.usbserial 9600

I work with Sun Microsystems servers and #. breaks to the ALOM, except I have a UK MacBook which has the £ above the 3 but am alt-3 gives me what I want!

Tuesday, 26 June 2007

Enable trackpad tapping (ala Windows)


To enable a tap on the trackpad to become a click instead of pressing the trackpad button, System Preferences -> Keyboard and Mouse -> Trackpad.

Clever stuff, a tap with TWO FINGERS mean a right-click of the mouse (good to get the extra options!)


Thursday, 21 June 2007

VirtueDesktop

I installed the freeware VirtueDesktop to give me a virtual desktop environment (for multiple workspaces).

I also configured the USB mouse - assign buttons to bring up the desktop, applications, etc using Dashboard & Expose control.

Wednesday, 20 June 2007

New MacBook

Not exactly the first day of owning and using my Apple MacBook (2.16GHz Intel Core 2 Duo + 2Gb RAM) but I will start blogging what I do to this baby here.

So far, I have installed the following applications:

I have managed to gain access as root (enabling and setting the root password) using MacHelp. Enabled sshd and allowed root to login.

To enable ssh (remote login):
  1. Open System Preferences and click Sharing.
  2. Click Services and select the Remote Login checkbox. Selecting Remote Login enables the secure FTP (sftp) service.
To enable the root user:
  1. Open NetInfo Manager, located in Applications > Utilities.
  2. Choose Security > Enable Root User and type a password for the root account. You may need to type an administrator password to make these changes.
  3. Choose Apple menu > Log Out.
  4. Choose Other in the Login window, type root in the Name field, and the root password in the Password field.
To allow root to ssh into your unix box:
  1. Edit /etc/sshd_config
  2. Uncomment 'PermitRootLogin yes'
  3. Restart sshd (or reboot)
I have updated iTunes and managed to transfer my iTune library from my Mac Mini to this MacBook. This is what I did:
  1. Export the MacMini iTunes library as an XML file
  2. Copy iTune files and library.xml from MacMini to MacBook
  3. Import library on MacBook
  4. Sync ipod
I have changed my user password, but now I need to change the keychain password as it keeps asking me for it each time I log in!

Again using MacHelp, here's the instructions:
  1. Open Keychain Access located in Applications/Utilities, and select the keychain in the Keychains list (click Show Keychains if the list is not open).
  2. Choose Edit > "Change Password for Keychain 'login'." (The name of the keychain in the menu matches the name of the selected keychain. If you selected the keychain that unlocks when you log in, the name you see is "login.")
  3. If the keychain is locked, type the password to unlock it.
  4. Type the current password for this keychain.
  5. Type a new password, then type it again to verify.
  6. Click OK.
Steps 1, 2, and 3 is a little confusing - Just start the Keychain Access (in Applications/Utilities) and go to the Menu and select Edit->Change Password for Keychain Login and follow 4, 5, and 6.